Are you familiar with Spotlight On...? It's a great online spot where we feature articles and information about beaders, bead stores, bead societies, books, color, and more every month. It's a fun resource where you can learn about all things bead-related!
Would you like to be featured in 2012? Do you have a great beading tale that you'd like to share with others? Want to show-off your favorite local bead store? Do you know of a bead society in your area that others might like to join? If so, feel free to let me know; we'd love to share your story in Spotlight On...!
Please email me at jamie@softflexcompany.com with suggestions and ideas of who and what you'd like to see featured in the new year. If you're looking for more information about a certain beading technique or want a tutorial on a specific project, don't hesitate to let me know that as well.
I look forward to hearing from you and I wish you a very healthy and happy New Year!

 These Simple Cut Quartz Nuggets are just gorgeous. Super sparkly due to their many facets, the beads are perfect to use when making earrings to celebrate the New Year! Though there is only a small amount of beading wire used in the design, you can make the earrings using any color of wire that will complement your party look! The instructions below are for a pair of earrings using Garnet Beading Wire, while the other examples shown are made with Green Turquoise and Purple Amethyst.
Materials needed:
12" of Garnet .019 Diameter Soft Flex Beading Wire
8 Sterling Silver 2mm Crimp Tubes
8 Sterling Silver 3mm Crimp Covers
1 Pair of Silver Plated Ear Wires
4 Clear Quartz 20x12mm Simple Cut Nuggets
Tools Needed:
Cutters
Crimping Pliers
Chain Nose Pliers
Finished Size: 2 1/4"
 Step 1: Use 3" of beading wire to string 1 crimp tube. Pass back through the tube, forming a small loop of wire. Crimp the crimp tube. Trim the wire end. Cover the crimp tube with 1 crimp cover.
 Step 2: String 1 quartz nugget and 1 crimp. Snug the crimp bead close to the bead, and crimp.
  Step 3: Cover the crimp tube with 1 crimp cover. Trim the wire end.
 Step 4: Use 3" of beading wire to string 1 crimp tube and the loop of wire formed in Step 1. Pass back through the tube, forming a small loop of wire. Crimp the crimp tube, trim the wire end, and cover the crimp tube with 1 crimp cover.
 Step 5: String 1 quartz nugget and 1 crimp tube. Pass back through the tube, leaving a small loop of wire. Crimp the crimp tube, trim the wire end, and cover the crimp tube with 1 crimp cover.
 Step 6: Attach 1 ear wire to the previous loop of beading wire.
Step 7: Repeat Steps 1-6 for the second earring.
Enjoy! Happy New Year to you all!

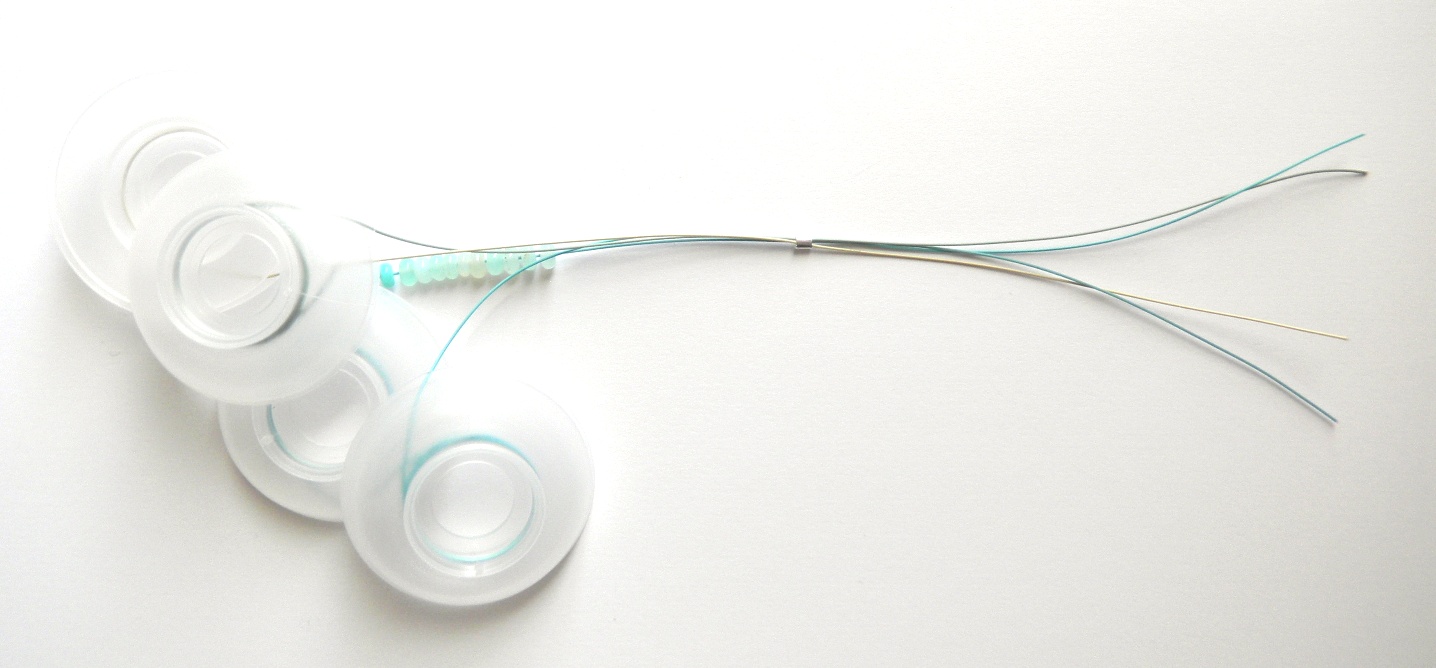
 If you've never used the Diva Custom Cord Maker to make jewelry, I highly recommend that you do. It comes with excellent instructions and is easy and fun to use. The Diva Board can be used to quickly make bracelets, necklaces, belts, handles/straps, and much more. I used it to make this lovely wrap bracelet using the Serenity Trios Wire Set, three different yarns, Peruvian opal beads, and brass findings. The combination of beading wire and yarn yields a wonderful texture; it feels soft on the wrist thanks to the yarn and has a great drape and flexibility due to the beading wire. I picked colors of yarn that complement the beading wire and the stones, including a soft cotton yarn that has a bit of brown in it, to enhance the color variation in the beads.
Materials needed:
48" of Fluorite .019 Diameter Soft Flex Beading Wire
48" of Bone .019 Diameter Soft Flex Beading Wire
96" of Green Turquoise .019 Diameter Soft Flex Beading Wire
48" of Bernat Cottontots Cotton Yarn in Cottage Colors
48" of I Love This Cotton! Yarn in Aqua Spark
48" of Baby Bee Pitter Patter Polyester Eyelash Yarn in Pea Pod
60 Peruvian Opal 4mm Rondelles
3 Peruvian Opal 14x10mm Faceted Ovals
4 Sterling Silver 3mm Crimp Tubes
3 Brass 7mm Blossom Bead Caps
1 Brass 10x18mm Lobster Clasp
1 Brass 9mm Etched Jump Ring
2 Brass 5mm Jump Rings
3 Brass 2" Head Pins
1 Brass 7x4mm Ornate Chain Link
Tools needed:
Cutters
Scissors
The Diva Custom Cord Maker
Mighty Crimping Pliers
Chain Nose Pliers
Round Nose Pliers
Finished size: 23 3/4"
 Step 1: Cut the Green Turquoise beading wire in half. You should have seven different 48" lengths of yarn and wire. Wind 1 length of yarn/wire around 1 of the small bobbins included with the Diva Custom Cord Maker. Repeat for all yarns and wires. (Though it's tempting to use the wire and yarn straight from the spool or skein, I recommend taking the time to wrap them on the bobbins in order to keep the weight and tension of the braid even as you work.) Use 1 Green Turquoise wire to string the Peruvian opal rondelles.
 Step 2: Use all four beading wires to string 1 crimp tube. Place the tube about 3" from the wire ends, and crimp.
 Step 3: Use the three yarn ends to tie an overhand knot around the crimp tube.
 Step 4: Use all seven wire/yarn ends to pass through the hole in the center of the Diva board. Place the tension clip (included in the Diva Custom Cord Maker package) on the knot/crimp bead.
 Step 5: Follow the instructions included with the Diva Custom Cord Maker to arrange each wire/yarn in one slot of the Diva board. With seven of the eight slots filled, *hold the Diva board so that the empty slot is facing you. Count three slots to the right and bring that wire/yarn down into the empty slot. Repeat from * with all of the wire/yarns. When the wire with the Peruvian opal rondelles is moved from one slot to another, slide 1 bead into the braid. As you continue to move wire/yarns, be sure the yarn following the bead traps the bead into the braid. Note: These instructions are written from a right-handed point of view. Count three slots to the left if you are left-handed. Extremely detailed instructions are included with the Diva board.
 Step 6: Continue braiding until the cord is about 24" long or until you've used up all the Peruvian opal beads.
  Step 7: Remove the tension clip from the beginning of the cord and attach it to the very end of the braid. Pull about four inches of wire/yarn through the Diva board and cut all wire/yarns, leaving 3" tails.
 Step 8: Use the four wire ends to string 1 crimp tube. Snug the tube up to the end of the braid, and crimp. Use all three yarn ends to tie an overhand knot around the crimp tube.
 Step 9: Use the four wire ends to string 1 crimp tube and the lobster clasp. Use all four wire ends to pass back through the tube, adjusting the tube so that it is next to the previous crimp tube. Crimp the crimp tube and trim the wire ends. Use the yarn ends to tie two overhand knots, covering the crimp tube. Repeat entire step for the other end of the wrap bracelet, attaching the beading wire to the etched jump ring.
 Step 10: Use 1 head pin to string 1 Peruvian opal oval and 1 bead cap. Use your fingers to press the bead cap around the oval. Form a wire-wrapped loop. Repeat twice for a total of three dangles. Attach one 5mm jump ring to 1 dangle. Attach the chain link to 1 dangle. Use one 5mm jump ring to attach the chain link to the other dangle.
 Step 11: Using a scrap of beading wire as a big-hole needle, pull the two cotton yarn tails on the lobster clasp end of the wrap bracelet through the 5mm jump ring attached to 2 dangles.
 Step 12: Use all three yarn ends to form 2 surgeon's knots to secure. Trim yarn ends.
 Step 13: Repeat Steps 11 and 12 for the other end of the wrap bracelet, using the 5mm jump ring on the remaining dangle.
  Wrap around a wrist three times and enjoy!Yarn available from Hobby Lobby. Clasp from Star's Clasps. Vintaj Brass findings from Fusionbeads.com.
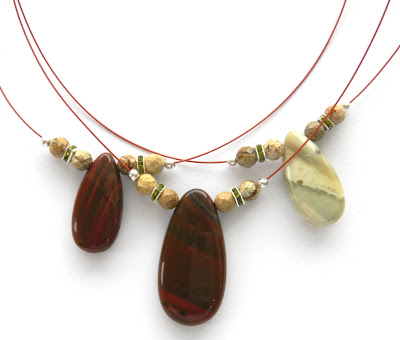
 Looking for a new necklace to wear to a holiday celebration this season? This lovely piece just might be your answer. It's dramatic, but not overpowering, pretty with just a bit of sparkle, and will look great worn with a fancy party dress or jeans and a t-shirt. With so many lovely colors available in each strand of these Imperial Jasper teardrops, you can make a few necklaces, all with slightly different color palettes, with only one strand of beads.
Materials needed:
66" of Red Jasper .019 Diameter Soft Flex Beading Wire
1 Sterling Silver 12mm Squaredelle Toggle Clasp with Olivine Crystals
6 Silver 4mm Squaredelle Beads with Olivine Crystals
10 Sterling Silver 2mm Crimp Tubes
10 Sterling Silver 3mm Crimp Covers
12 Picture Jasper 6mm Faceted Rounds
2 Imperial Jasper 15x30mm Top-Drilled Teardrops
1 Imperial Jasper 20x40mm Top-Drilled Teardrop
Tools needed:
Cutters
Crimping Pliers
Bead Stoppers
Finished size: 21 1/2"
 Step 1: Cut three 22" pieces of wire. Use 1 wire to string 1 crimp tube, 1 Picture Jasper round, 1 Squaredelle bead, 1 Picture Jasper round, the 20x40mm Imperial Jasper teardrop, 1 Picture Jasper round, 1 Squaredelle bead, 1 Picture Jasper round, and 1 crimp tube. Attach 1 Bead Stopper to both ends of the wire.
 Step 2: Repeat Step 1 twice using the 15x30mm Picture Jasper teardrops.
 Step 3: Carefully remove 1 Bead Stopper from one end of every wire. Arrange all three wires so that they're the same length and attach 1 Bead Stopper to all three wires. Repeat for the other ends of the wires.
 Step 4: Adjust the beads on the wire with the 20x40mm teardrop so that they're in the center of the wire. Crimp both crimp tubes. Cover each crimp tube with a crimp cover. Adjust the beads on the other two wires so that the beads on one wire are to the right of the previous wire, with the left crimp tube hitting at about the center of the 20x40mm teardrop, and the beads on the other wire are to the left of the previous wire, with the right crimp tube hitting at about the center of the 20x40 teardrop. Crimp and cover all crimp tubes.
 Step 5: Carefully attach 1 Bead Stopper to all three wires about 3" from the closest crimp tube/cover. Loosely braid the three wires together for about 5 1/2 to 6", making sure to leave the wire tails long enough to be able to crimp to the clasp later on. Use all three wires to string 1 crimp tube and crimp. Remove the Bead Stopper.
 Step 6: Cut two of the short wire ends. Cover the crimp tube with 1 crimp cover. Use the remaining wire to string 1 crimp tube and one half of the clasp. Pass back through the tube and crimp. Cover the crimp tube with 1 crimp cover.
Step 7: Repeat Steps 5 and 6 for the other half of the necklace.
The necklace below was made with other Imperial Jasper teardrops from the same strand as the necklace above, with Garnet round beads, Squaredelle beads with Siam Ruby crystals, and Garnet .019 Diameter Soft Flex Beading Wire.
 Enjoy!

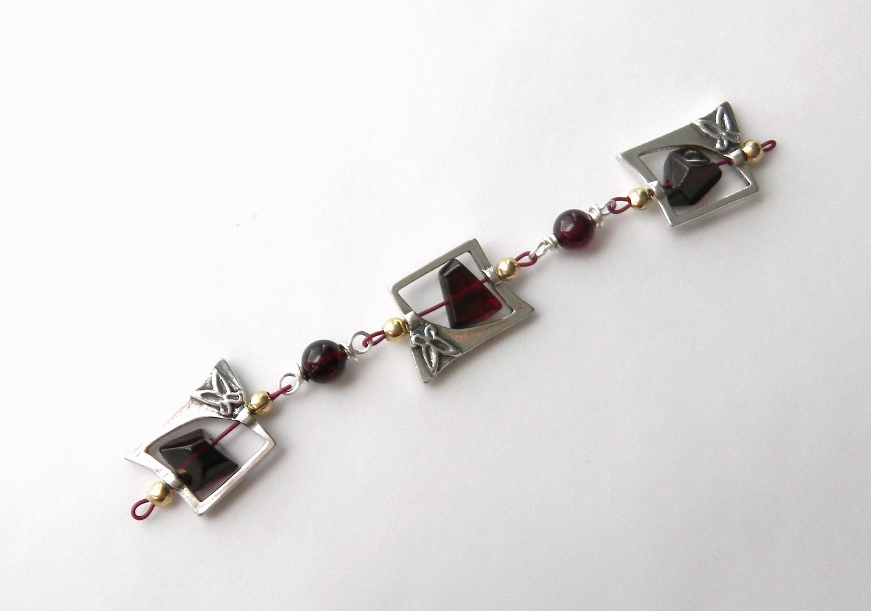
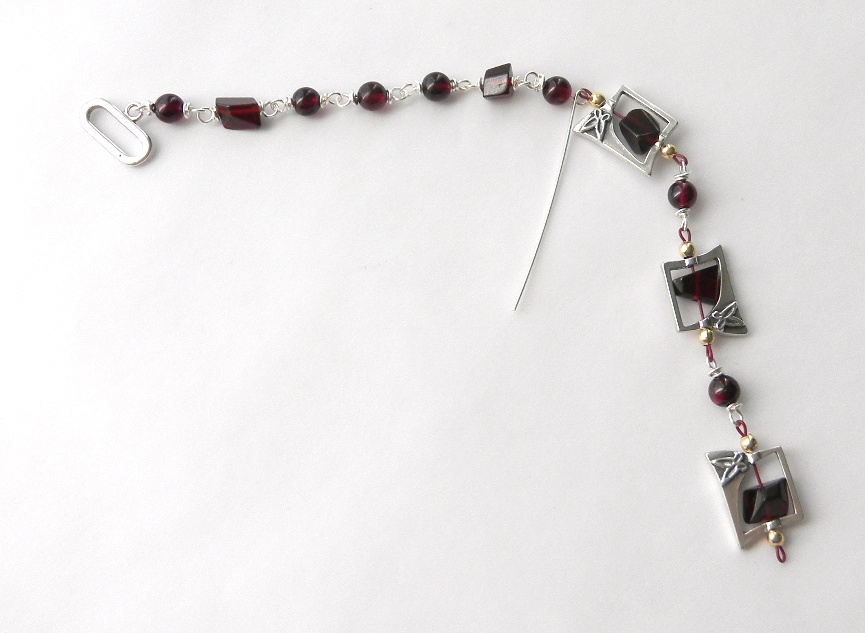
 For awhile now, I've noticed finished jewelry made with mixed metals (silver and brass, gunmetal and gold, pewter and brass, etc.). It's a trend that seems to keep growing, which is great since I love the look of it all. Here's a necklace that's mostly silver with just touches of gold mixed in, in the forms of wire and crimp findings. Garnet stones in round and faceted shapes and simple silver bead frames add elegance and drama to an otherwise simple-to-assemble necklace. There are lots of steps in this necklace, but they're all pretty basic. This piece would be lovely made in just about any color palette and mixture of metals.
Materials needed:
38" of Non-Tarnish Silver 22-Gauge Craft Wire
48" of 24K Gold .019 Diameter Beading Wire
48" of 925 Sterling Silver .019 Diameter Beading Wire
64" of Garnet .019 Diameter Beading Wire
16x10mm Sterling Silver Oval Toggle Clasp
22 Gold-Filled 1mm Crimp Tubes
44 Sterling Silver 1mm Crimp Tubes
22 Sterling Silver or Gold-Filled 2mm Crimp Tubes
22 Gold-Filled 3mm Crimp Covers
4 Sterling Silver 14x17mm Butterfly Bead Frames
29 Garnet 5mm Round Beads
26 Garnet 5x4-8x9mm Simple Cut Nuggets
Tools needed:
Cutters
Crimping Pliers
Nylon Jaw Cutters
Chain Nose Pliers
Round Nose Pliers
Micro Crimping Pliers
Needle Nose Pliers
Bead Stoppers
Finished Size: 23"
 Step 1: Use 4" of Garnet beading wire to string one 2mm crimp tube. Pass one end of the wire back through the tube. Adjust the wire and the crimp tube so there is a small loop of wire, and crimp. Cover the crimp tube with 1 crimp cover. Use the long end of the wire to string the first hole of 1 bead frame, 1 garnet nugget, the second hole of the bead frame, and one 2mm crimp tube. Pass back through the tube, adjusting the wire to form a small loop, and crimp as close to the bead frame as possible. Cover the crimp tube with 1 crimp cover. Repeat three times to make a total of four beading wire links.
 Step 2: Use 2" of craft wire to form a wrapped loop that attaches to one loop of 1 beading wire link. String 1 garnet round and form a wrapped loop that attaches to one loop of a second beading wire link. Use 2" of craft wire to form a wrapped loop that attaches to the other loop of the previous beading wire link. String 1 garnet round and form a wrapped loop that attaches to one loop of a third beading wire link. Set aside.
 Step 3: Use 2" of craft wire to form a wrapped loop. String 1 garnet nugget and form a wrapped loop. *Use 2" of craft wire to form a wrapped loop that attaches to the previous wrapped loop. String 1 garnet round and form a wrapped loop. Repeat from * twice. Use 2" of craft wire to form a wrapped loop that attaches to the previous wrapped loop. String 1 garnet nugget and form a wrapped loop.
  Step 4: Use 2" of craft wire to form a wrapped loop that attaches to the ring half of the clasp. String 1 garnet round and form a wrapped loop that attaches to one end of 1 garnet chain.
 Step 5: Use 2" of craft wire to form a wrapped loop that attaches to the other end of the garnet chain. String 1 garnet round and form a wrapped loop that attaches to one beading wire loop of the chain formed in Step 2.
 Step 6: Use 3" of craft wire to form a large (about 6mm) wrapped loop. String 1 garnet round and form a wrapped loop that attaches to the other end of the chain.
  Step 7: Repeat Steps 3-6 for the other end of the necklace, using the bar half of the clasp and the single link remaining from Step 1. Set both necklace ends aside.
 Step 8: Place a Bead Stopper on one end of 16" of 925 Sterling Silver beading wire. String 1 sterling silver 1mm crimp tube and 1 garnet nugget. String {2 sterling silver 1mm crimp tubes, 1 garnet round, 2 sterling silver 2mm crimp tubes, and 1 garnet nugget} five times. String 1 sterling silver 1mm crimp tube. Place a Bead Stopper on the wire end. Repeat entire step using 24K Gold beading wire and gold-filled 1mm crimp tubes. Repeat step again using Garnet beading wire and gold-filled 1mm crimp tubes. Set aside.
 Step 9: Use two 16" pieces of 24K Gold beading wire and one 16" piece of Garnet beading wire to string one 2mm crimp tube. Place the tube about 2" from the wire ends, and crimp. Trim the Garnet beading wire end and one 24K Gold beading wire end. Do not cut the remaining wire end. Braid the three wires together for about 9 1/2". Use all three wires to string one 2mm crimp tube. Measure the braid so that there are 9 1/2" between the crimp tubes, and crimp. Trim the Garnet beading wire end and one 24K Gold beading wire end. Do not cut the remaining wire end. Cover the crimp tubes with crimp covers.
 Step 10: Repeat Step 9 using two 16" pieces of 925 Sterling Silver wire and one 16" piece of Garnet wire. Set braided wire strands aside.
 Step 11: Remove the Bead Stopper and use the Sterling Silver wire strand with the garnet beads to string one 2mm crimp tube and the 6mm wrapped loop from one end of the necklace. Pass back through the tube, and crimp. Cover the crimp tube with 1 crimp cover. Repeat four times, attaching the strands in the following order: the Gold/Garnet braided strand, the Garnet wire strand with the garnet beads, the Sterling Silver/Garnet braided strand, and the Gold wire strand with the garnet beads, removing Bead Stoppers as necessary. Repeat entire step for the other end of the necklace.
  Step 12: Place the necklace on the workspace and adjust the 1mm crimp tubes and the garnet beads on the 925 Sterling Silver, 24K Gold, and Garnet beading wire strands as desired. Use Micro Crimping Pliers or needle nose pliers to crimp the 1mm crimp tubes, securing the garnet beads in place.
Enjoy!

 This week I challenged myself to use all three sizes of crimping pliers in a project and, after a couple of failed attempts at holiday decorations, these earrings were created. Made with the three colors of the Renewal Trios wire set (one of my favorites!) and only a few peridot beads, these earrings are simple to make and are oh-so-pretty with just the right amount of sparkle.
My bead stash yielded a random assortment of small peridot beads leftover from other projects that turned out to be perfect for these earrings, so feel free to experiment. I can picture these earrings made with many of the Trios sets, just be sure to use varying shapes and sizes of of the same color bead to help blend all the wire colors together.
Materials needed:
5" of Chrysoprase .019 Diameter Soft Flex Beading Wire
9 1/2" of Peridot .019 Diameter Soft Flex Beading Wire
8" of Green Emerald .019 Diameter Soft Flex Beading Wire
2 Sterling Silver 3mm Crimp Tubes
2 Sterling Silver 2mm Crimp Tubes
12 Sterling Silver 1mm Crimp Tubes
2 Sterling Silver 4mm Soldered Jump Rings
1 pair of Silver Plated Ear Wires
4 Peridot 3.5x4mm Faceted Ovals
2 Peridot 3.5x5-4x7mm Faceted Tubes
2 Peridot 6x7-6x8mm Smooth Ovals
Tools needed:
Cutters
Mighty Crimping Pliers
Crimping Pliers
Micro Crimping Pliers
Bead Stoppers
Finished size: 2 3/4"
Note: though I didn't include Bead Stoppers in any of the pictures here, I assure you I used several of them for this project and highly recommend them!
 Step 1: Attach 1 Bead Stopper to one end of 2 1/2" of Chrysoprase wire. String one 1mm crimp tube, 1 peridot faceted oval, and one 1mm crimp tube. Attach the Bead Stopper to the other end of the wire and set aside. Repeat, using 4 3/4" of Peridot wire to string one 1mm crimp tube, 1 peridot faceted tube, and one 1mm crimp tube. Repeat again, using 4" of Green Emerald wire to string one 1mm crimp tube, 1 peridot smooth oval, and one 1mm crimp tube. Do not crimp any crimp tubes.
 Step 2: Remove all Bead Stoppers and carefully gather together both ends of the Chrysoprase and Green Emerald wires and one end of the Peridot wire. Place the other end of the Peridot wire so that it is 1 1/2" longer than all other wire ends. Use all six wire ends to string one 3mm crimp tube so that it rests at the very end of the group of five wire ends. Use Mighty Crimping Pliers to crimp the tube.
 Step 3: Use the remaining Peridot wire end to string 1 peridot faceted oval, one 2mm crimp tube, and 1 jump ring. Pass back through the tube, making sure to nestle the peridot oval between the 3mm and 2mm crimp tubes as snugly as possible, and crimp. Attach 1 ear wire to the jump ring.
 Step 4: Repeat Steps 1-3 to make a second earring.
 Step 5: Adjust the 1mm crimp tubes and peridot beads on both earrings so that they are mirror images of each other. Use Micro Crimping Pliers to crimp the 1mm crimp tubes, keeping the peridot beads secured in their spots on the wires.
Enjoy!

 Are you familiar with Spotlight On...? It's a great online spot where we feature articles and information about beaders, bead stores, bead societies, books, color, and more every month. It's a fun resource where you can learn about all things bead-related!