 If you've never used the Diva Custom Cord Maker to make jewelry, I highly recommend that you do. It comes with excellent instructions and is easy and fun to use. The Diva Board can be used to quickly make bracelets, necklaces, belts, handles/straps, and much more. I used it to make this lovely wrap bracelet using the Serenity Trios Wire Set, three different yarns, Peruvian opal beads, and brass findings. The combination of beading wire and yarn yields a wonderful texture; it feels soft on the wrist thanks to the yarn and has a great drape and flexibility due to the beading wire. I picked colors of yarn that complement the beading wire and the stones, including a soft cotton yarn that has a bit of brown in it, to enhance the color variation in the beads.
Materials needed:
48" of Fluorite .019 Diameter Soft Flex Beading Wire
48" of Bone .019 Diameter Soft Flex Beading Wire
96" of Green Turquoise .019 Diameter Soft Flex Beading Wire
48" of Bernat Cottontots Cotton Yarn in Cottage Colors
48" of I Love This Cotton! Yarn in Aqua Spark
48" of Baby Bee Pitter Patter Polyester Eyelash Yarn in Pea Pod
60 Peruvian Opal 4mm Rondelles
3 Peruvian Opal 14x10mm Faceted Ovals
4 Sterling Silver 3mm Crimp Tubes
3 Brass 7mm Blossom Bead Caps
1 Brass 10x18mm Lobster Clasp
1 Brass 9mm Etched Jump Ring
2 Brass 5mm Jump Rings
3 Brass 2" Head Pins
1 Brass 7x4mm Ornate Chain Link
Tools needed:
Cutters
Scissors
The Diva Custom Cord Maker
Mighty Crimping Pliers
Chain Nose Pliers
Round Nose Pliers
Finished size: 23 3/4"
 Step 1: Cut the Green Turquoise beading wire in half. You should have seven different 48" lengths of yarn and wire. Wind 1 length of yarn/wire around 1 of the small bobbins included with the Diva Custom Cord Maker. Repeat for all yarns and wires. (Though it's tempting to use the wire and yarn straight from the spool or skein, I recommend taking the time to wrap them on the bobbins in order to keep the weight and tension of the braid even as you work.) Use 1 Green Turquoise wire to string the Peruvian opal rondelles.
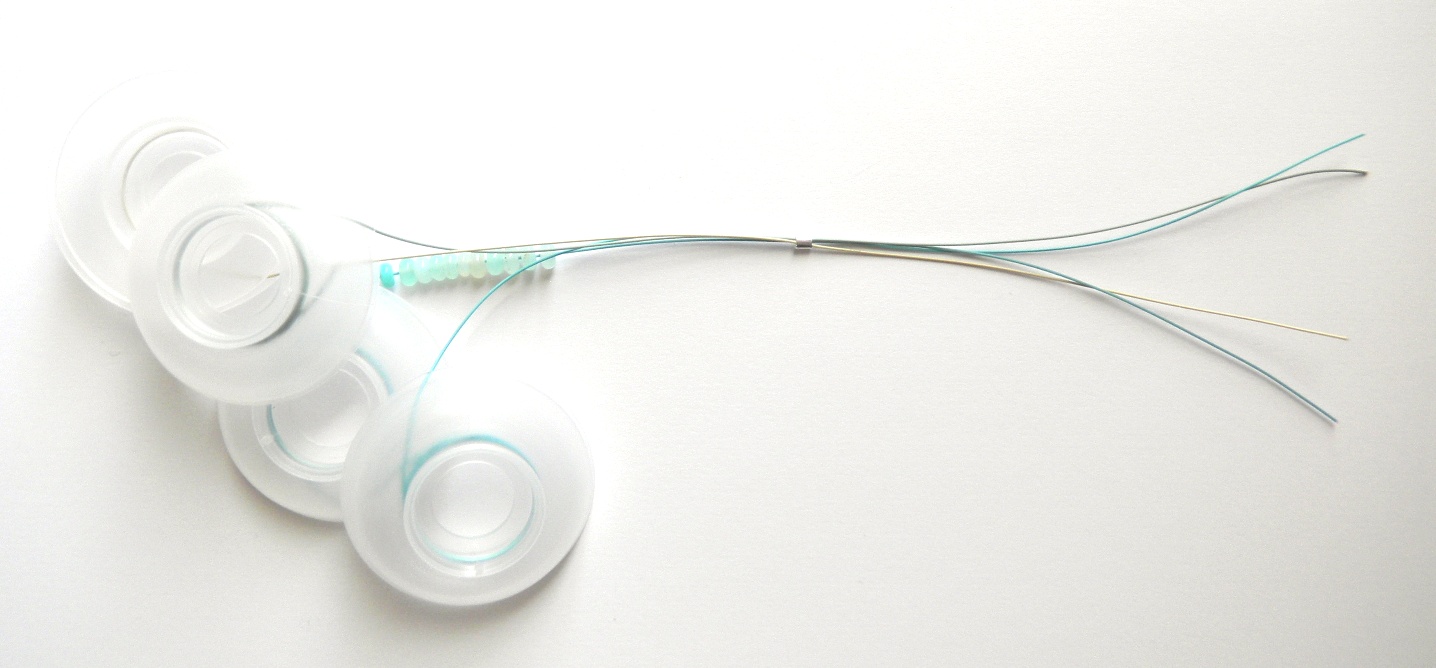 Step 2: Use all four beading wires to string 1 crimp tube. Place the tube about 3" from the wire ends, and crimp.
 Step 3: Use the three yarn ends to tie an overhand knot around the crimp tube.
 Step 4: Use all seven wire/yarn ends to pass through the hole in the center of the Diva board. Place the tension clip (included in the Diva Custom Cord Maker package) on the knot/crimp bead.
 Step 5: Follow the instructions included with the Diva Custom Cord Maker to arrange each wire/yarn in one slot of the Diva board. With seven of the eight slots filled, *hold the Diva board so that the empty slot is facing you. Count three slots to the right and bring that wire/yarn down into the empty slot. Repeat from * with all of the wire/yarns. When the wire with the Peruvian opal rondelles is moved from one slot to another, slide 1 bead into the braid. As you continue to move wire/yarns, be sure the yarn following the bead traps the bead into the braid. Note: These instructions are written from a right-handed point of view. Count three slots to the left if you are left-handed. Extremely detailed instructions are included with the Diva board.
 Step 6: Continue braiding until the cord is about 24" long or until you've used up all the Peruvian opal beads.
  Step 7: Remove the tension clip from the beginning of the cord and attach it to the very end of the braid. Pull about four inches of wire/yarn through the Diva board and cut all wire/yarns, leaving 3" tails.
 Step 8: Use the four wire ends to string 1 crimp tube. Snug the tube up to the end of the braid, and crimp. Use all three yarn ends to tie an overhand knot around the crimp tube.
 Step 9: Use the four wire ends to string 1 crimp tube and the lobster clasp. Use all four wire ends to pass back through the tube, adjusting the tube so that it is next to the previous crimp tube. Crimp the crimp tube and trim the wire ends. Use the yarn ends to tie two overhand knots, covering the crimp tube. Repeat entire step for the other end of the wrap bracelet, attaching the beading wire to the etched jump ring.
 Step 10: Use 1 head pin to string 1 Peruvian opal oval and 1 bead cap. Use your fingers to press the bead cap around the oval. Form a wire-wrapped loop. Repeat twice for a total of three dangles. Attach one 5mm jump ring to 1 dangle. Attach the chain link to 1 dangle. Use one 5mm jump ring to attach the chain link to the other dangle.
 Step 11: Using a scrap of beading wire as a big-hole needle, pull the two cotton yarn tails on the lobster clasp end of the wrap bracelet through the 5mm jump ring attached to 2 dangles.
 Step 12: Use all three yarn ends to form 2 surgeon's knots to secure. Trim yarn ends.
 Step 13: Repeat Steps 11 and 12 for the other end of the wrap bracelet, using the 5mm jump ring on the remaining dangle.
  Wrap around a wrist three times and enjoy!
Yarn available from Hobby Lobby. Clasp from Star's Clasps. Vintaj Brass findings from Fusionbeads.com.

Guest blogger Jamie Hogsett is the Education Coordinator for Soft Flex Company. Contact her at Jamie@SoftFlexCompany.com.